January 17, 2023
An 80’s Entertainment Center In The Kitchen?
Summary
Kitchen islands can be super expensive. So why not make your own, especially if you have a small space and need it to be mobile? This blog and video will take you through the steps of turning a typical TV cabinet into a functional kitchen island, complete with corbels, a drop-leaf, and punched "tin".
Ever since watching HGTV in the early 2000’s, I have wanted to convert a desk into a kitchen island. It seemed simple, thrifty, and oozing with charm. I got an opportunity to do the next best thing a few weeks ago.
My friend, Joni, is a cosmetics distributor who works from her home where she does makeovers. She has tons of little tubes of color and magical elixirs to make us look and feel better. Her kitchen is command central and when I went for my transformation, she was in the middle of trying to figure out how to make food prep, dining, and makeup counter, all work together. I asked her if she had ever considered an island. She had but realized that the price tag for most was daunting. I offered my services and we set a budget of $100. (Cue Mission Impossible theme song.)
First stop: A Better Way Bargains
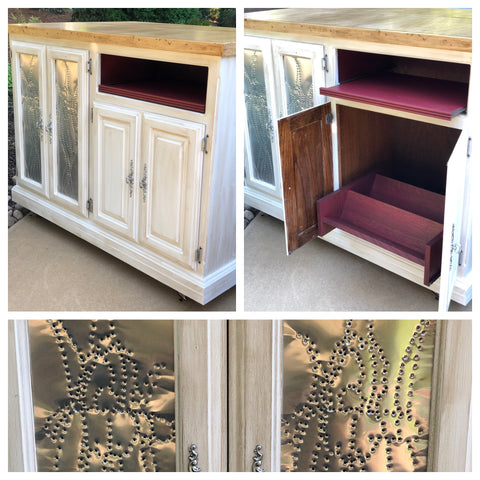
I found an 80’s entertainment center that seemed to be missing a part but it was all I needed. It was a hefty piece of furniture with leaded glass doors. But what sold me was the pull-out shelf and CD organizer, perfect for little vials. It had wheels and was the right size. On top of that, the price was awesome, only $40.

The Design Plan
Functionally, Joni needed more countertop, a bar for eating because this was replacing her kitchen table, and loads of storage. So, the priority was to add a new top and drop-leaf, almost doubling the work surface where she could pull up some stools. Good wheels were also a must. (I broke one of the original ones as I was unloading the piece. That was $25 error.) Style-wise, Joni considered herself to lean Bohemian. (I would add French Country to that.) She loved dark red with blue-green. She showed me a tray that was the image of Van Gogh’s irises that served as her inspiration piece. With all that information, we landed on an aged-white body, “shiplap” on the back, a natural wood top, and chicken wire doors to replace the leaded glass. (I later decided to surprise Joni with punched “tin” doors with the iris motif. She didn’t seem over-the -moon with the chicken wire idea.) The jury was still out on whether I would do anything with the inside, incorporating her favorite red.
The Process
- Decide on the finished height. Add wood to the bottom if necessary, taking into consideration the height of your wheels.
- Cut ¼” underlayment (luan) into strips. Using Liquid Nails and ½ brads, attach “shiplap” to the back.
- Trim out the cabinet.
- Cut the top and drop-leaf out of plywood.
- Trim around top and drop-leaf with 1” x 2”s
- Notch out for hinges if necessary.
- Make corbels.

- Sand cabinet.
- Spray paint hardware.
- Prime body, two coats for dark wood.
- To age the top, bang it up a bit.
- Coat the top with one layer of polyurethane.
- Wipe stain over top, rubbing it into the imperfections, then quickly wipe it off.
- Add two more layers of polyurethane, sanding in between.
- Paint body with two coats.
- Dry-brush a pop of color on the inside. (I just did the shelves and the open area that was always visible.)
- Take a rag that has stain on it and rub it over the surface to create an aged effect.
- Make punched tin by using aluminum flashing, a nail set, clear contact paper, hammer, foam board, and hard surface. (Watch the video for details.)
- Install tin panels.
- Attach doors and hardware.
- Attach corbels with hinges.
- Attach drop leaf.

The Result
TA-DAH! I know that went by super-fast, but that is why there is a video. Anyway, give it a go!